Kappa v3.0 shader
HARDTOPnet download page
Instructions & HowTo's |
 |
If you need directions for how to download/install shaders and textures on Minecraft, read this page.
Recently a new mod called Iris has come under the spotlight. Combined with other performance-oriented mods it can offer a much better/smoother gameplay experience.
but what's the most interesting about this, is that Iris is aiming to support most Optifine shaders as well. In its current implementation it cannot load normals/PBR maps and still has issues with lots of shaders, but some shaders already work reportedly very well.
The Iris GitHub has info on which shaders are already working. I'll probably add some instructions about Iris at some point here as well. For the time being, this guide is for Optifine only.
For Minecraft Java Edition, shaderpacks can be used thanks to the Optifine mod (successor to ShadersMod). No hardware raytracing is required although most Intel and some AMD GPUs can have issues with some shaders.
You have to install Optifine first, then and download and install shaderpacks in the relevant folders.
You'll also have to use an appropriate resourcepack, for the details on which PBR flavor you need, check the Shader and pack configuration section below.
Steps to follow (detailed instructions below):
- Download Optifine
- Make sure the Minecraft version corresponding to the Optifine version you download is installed. If not, run it once so it's downloaded on your system
- Run the Optifine installer
- Download and install shaderpacks to your Minecraft install
- Download and install resourcepacks to your Minecraft install
- Activate the right PBR format for the selected shader
- [optional] Adjust Minecraft configuration for memory and performance
(Check this if your computer hangs/crashes when loading high res packs, or have low FPS.)
How-to: get Optifine
Make sure you're using the Java Edition because Optifine doesn't work with Bedrock.
First you need to install Optifine.
The official Optifine website is https://optifine.net, and the Optifine downloads can be found at https://optifine.net/downloads.
Download the latest version that corresponds to your desired Minecraft version. This Minecraft version must be installed already before attempting to install Optifine, so make sure to start Minecraft at least one and to launch the version you want to play.
 |
 |
Once Optifine download is complete (please note your browser might issue a security warning, but you the file is safe if you downloaded it from the official website), you have to execute the .JAR installer file.
How-to: install Optifine
To launch the Optifine installer you need Java installed. Minecraft comes shipped with Java binaries so if you don't have Java installed on your system, you can still use the one Minecraft ships with.
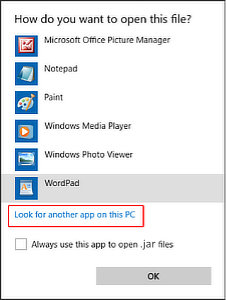
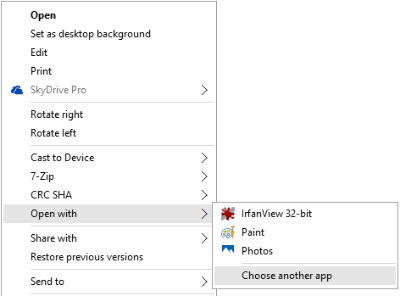
If Java is installed, most of the time double-clicking the .JAR file will execute it. If not, follow these instructions to run the installer with the shipped Java binary:
Right-click the .JAR file, select open with... then either Choose another app... or Look for another app on this PC. If you don't see one of these options you might have to click more apps for it to show.
-
Browse to the folder where you installed your Minecraft launcher (usually C:\Program Files\Minecraft Launcher\ then subfolders runtime\jre-x64\bin\ and select file javaw.exe.
-
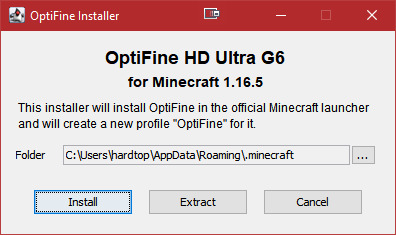
When Optifine installer is launched you'll be presented with a screen like the one below. Most of the time you can go with the default installation path.
You just need to click install to start the patching process.
-
After a couple of seconds, Optifine should be installed and ready to be used.
 |
 |
How-to: download and install shaderpacks
Now you've installed Optifine, you can download and use shaderspacks. You can find a quite comprehensive (and regularly maintained) list on the ShadersLabs wiki.
-
After you downloaded one (or more) shaderpacks, you must put them in the appropriate folder for Optifine to find and load them.
-
EITHER: Copy/Move the shaderpack .ZIP file in the right folder.
Shaders are usually stored in the following subdirectory:
C:\Users\%USERNAME%\AppData\Roaming\.minecraft\shaderpacksOr, more simply
%APPDATA%\.minecraft\shaderpacksmake sure your .ZIP files are stored in that exact folder, not in any subfolder. Moreover, if the shader doesn't show up in the selection screen, make sure the .ZIP structure is correct:
a correct shaderpack .ZIP should contain a /shaders subfolder on the first level.Here's an example with the MollyVX shader .ZIP file:

-
OR: You can also do it from the game:
-
in the main menu click:
Options\Video Settings...\Shaders...


-
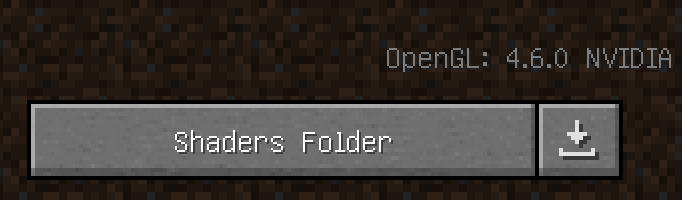
and click the Shaders Folder button on the bottom-left of the screen. This will open an Explorer window at the aforementioned /shaderpacks folder.
Note: the small button with a downward pointing arrow just besides the Shaders Folder button is a direct link to the fandom shaders page I already told you about.
-
-
How-to: download and install resourcepacks (RP's)
Installing a resourcepack is pretty similar to installing a shaderpack.
When your HARDTOPnet resourcepack is done downloading, you first have to install the .ZIP file to the appropriate folder
-
EITHER: You can do it manually. Copy/move the .ZIP file to this folder:
C:\Users\%USERNAME%\AppData\Roaming\.minecraft\resourcepacksOr, more simply
%APPDATA%\.minecraft\resourcepacksAgain, make sure the .ZIP files are not stored in a subfolder. If your pack doesn't show in the resourcepacks list in game, make sure the .ZIP has the appropriate structure:
there should at least be a pack.mcmeta and an /assets subfolder in the .ZIP root.Here's how the Vanillaccurate pack .ZIP file looks:

-
OR: if you use Minecraft in windowed mode you can drag and drop a resourcepack .ZIP file on this screen to install it in the right folder automatically.
-
-
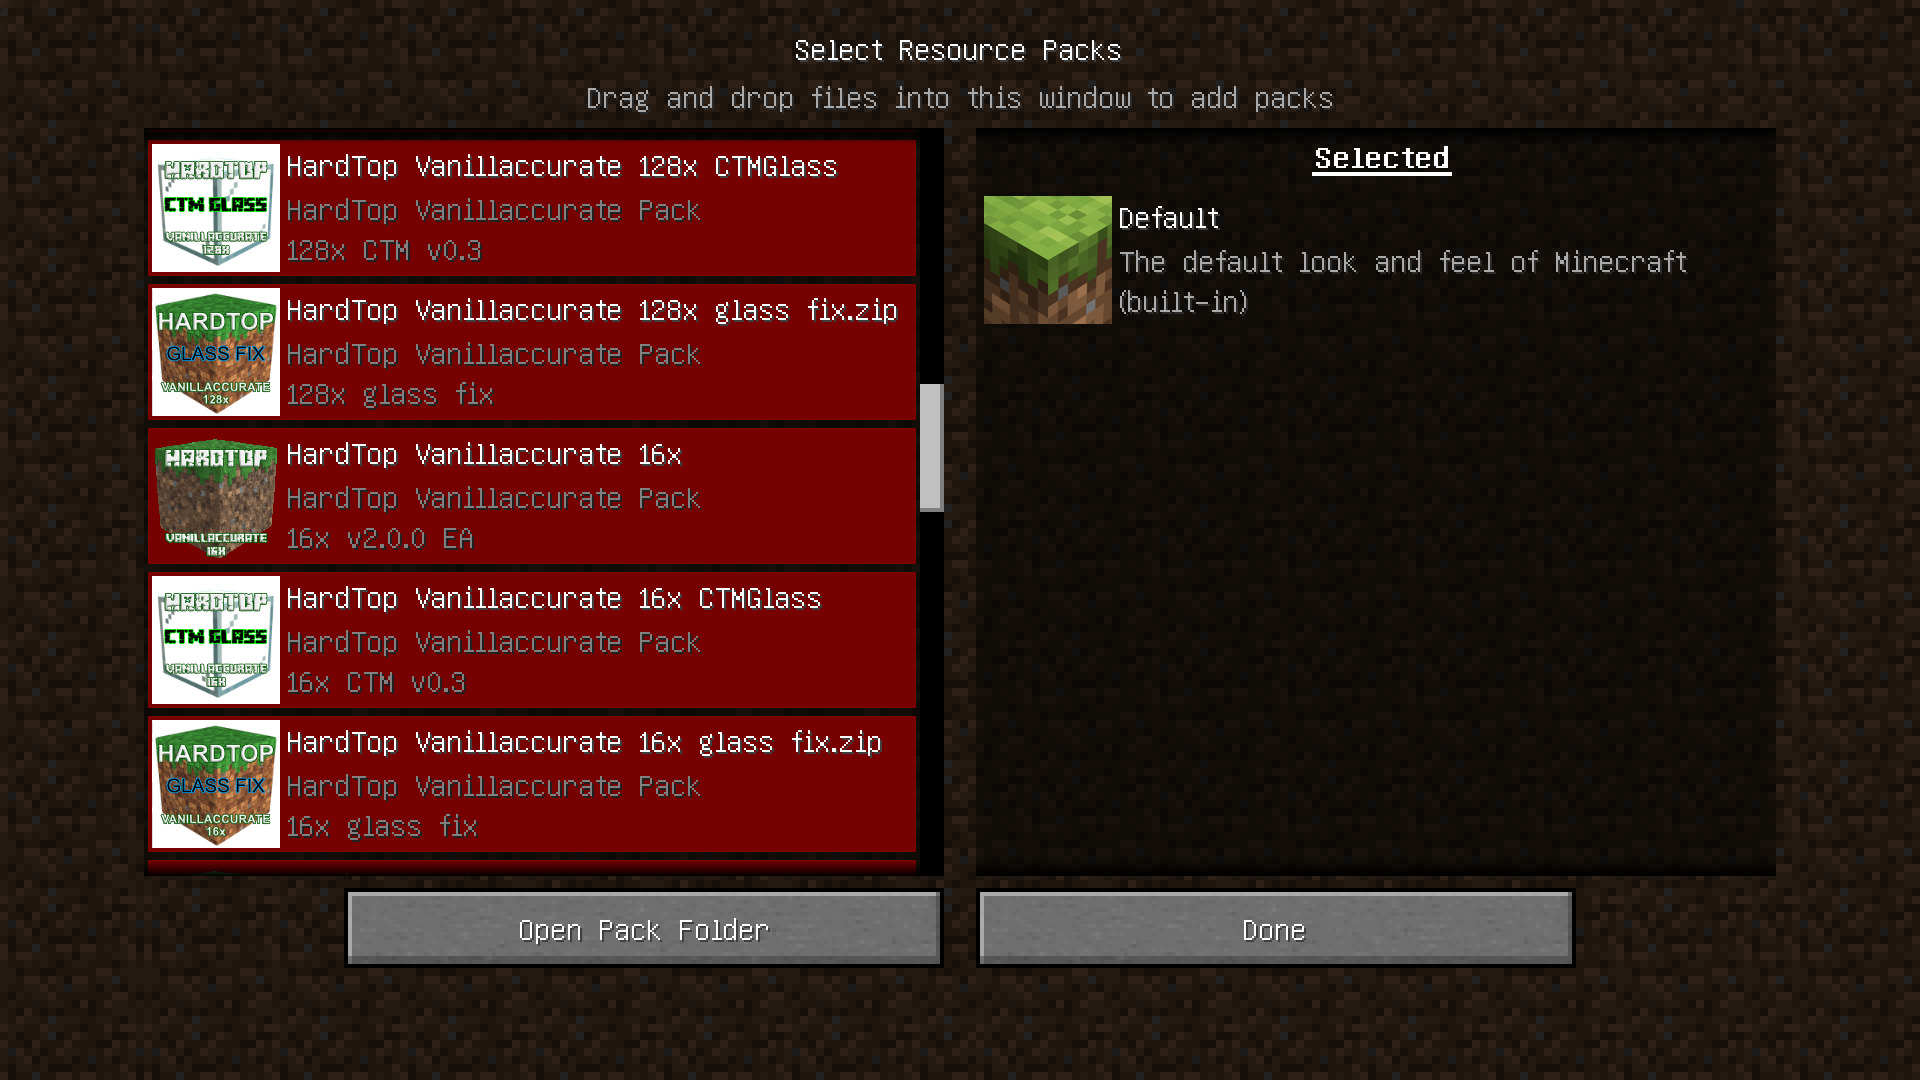
Next you have to load the resourcepack (or resourcepacks if there are multiple like Realaccurate 2K or add-ons) in game. Here's how to load a resourcepack.
On the main menu, click Options\Resource Packs...

It'll open a list of installed resourcepacks. Scroll to the one you want to use. You might notice the pack being displayed in red and marked as from a previous version/format. It's not an issue, I left it at an earlier version for backwards compatibility reasons.
Now click the arrow on the pack icon to add it to the right panel (active packs). You'll get this message:
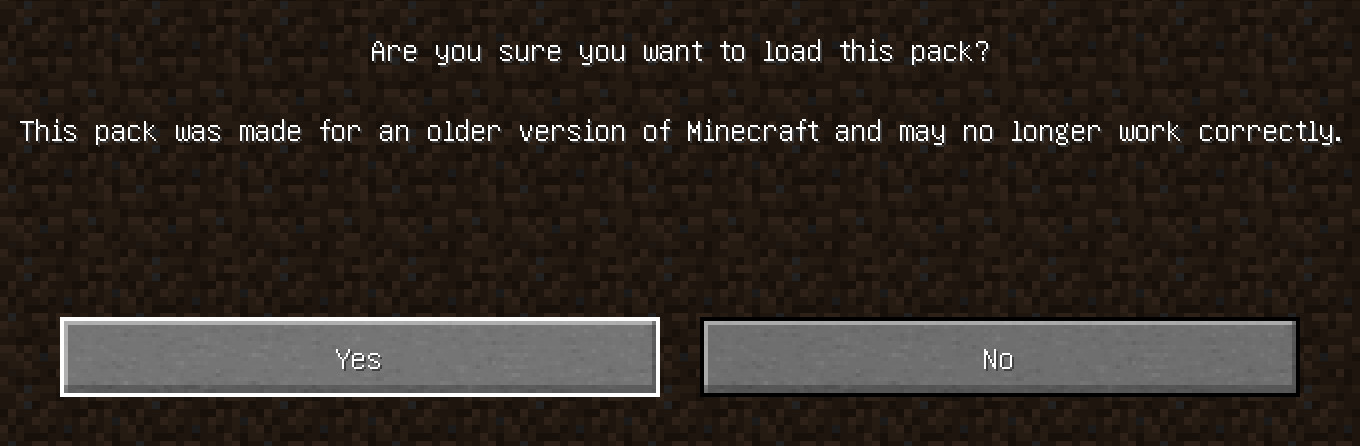
PLEASE disregard that message and click Yes, as I mentioned earlier the packs use an older format for compatibility reasons but they WILL work with later versions.
-
Now you can click Done and start your game!
How-to: pick the right PBR pack
When downloading the HARDTOPnet resourcepacks you'll notice they come in two variants, OldPBR and LabPBR. What are those? What is PBR?
PBR stands for physically-based rendering, and is a very loosely defined term to indicate a rendering pipeline or material maps use values that are based on physical properties.
For shaders to be able to show fancy effects such as metallic reflections or emissive textures, you need a texture pack that stores such effects (as material physical properties) in so-called "maps" alongside the main "texture".
The most common and well-known "map" besides the diffuse map (which is what's usually known as the base texture) is the normal map. But there are a lor more!
The maps must be stored in a specific order in the available files. The way maps are stored defines the format. The two main standards for PBR packs are currently OldPBR and LabPBR:
As the name implies, OldPBR is the older format that's mostly used by older shaders and currently by SEUS shaders (Renewed, PTGI). Most recent shaders now switched to LabPBR. Check the list below to know which PBR flavor you need to use with each shader.
-
BSL versions v7.1.04 and later
use the default LabPBR pack; the resource pack parameter should read PBR or better yet LabPBR. PBR+emissive *could* work with OldPBR but there would be missing features and sub-par results.
v7.1.04 uses LabPBR 1.1, v7.1.05 and later (v8.0, v8.1...) all use LabPBR 1.3
Enable Materials/Advanced Materials and reflections in Materials/Speculars & Reflections (set Reflections to full, enable rough and specular reflections, as well as rain reflections)
Also enable tinted hardcoded metal so materials can render as intended.
Don't forget to enable Materials/Normals & Parallax/Parallax Occlusion Mapping, raise Parallax samples a bit unless it's too taxing on your FPS (mine is set to 256).
You can enable Directional lightmaps but it's up to you. -
Kappa 2.1 and later
also use the default LabPBR pack and set the LabPBR version to 1.3 whenever possible.
LabPBR 1.3 support started with Kappa v2.2. Versions include 3.0/3.1 (first with SSPT emission) and 4.0/4.1 (using latest Optifine G8 features).
versions 3.x are more suited for survival gameplay than 2.x and 4.x at the moment, so these are the ones I'd recommend for general gameplay.
versions 4.x look much more detailed and SSPT indirect light gives much more depth to the scenes but autoexposure can make it hard to use for gameplay during night or underground.
For 3.x, go to Lighting/Lights and set Blocklight Multi to 0.1 and Emitter boosting to off
In Terrain/Reflections enable Resourcepack Reflections, Terrain/Parallax Occlusion Mapping enable Parallax Occlusion Mapping and raise Samples a bit.
For 4.x, go to Lighting/Colors and set Blocklight Strength to 0.1. Also, Lighting/Indirect Light and set Emission Mode to Hardcoded + LabPBR and enable Texture AO
In Terrain/Reflections enable Resourcepack Reflections, Terrain/Parallax Occlusion Mapping enable Parallax Occlusion Mapping and raise Samples a bit. -
KappaPT
This one was built from the ground up with LabPBR in mind. -
Nostalgia and NostalgiaVX
also use the default LabPBR pack and set the LabPBR version to 1.3 whenever possible.
Nostalgia 2.0 to 2.2 support LabPBR 1.2, from version 2.3 upwards the LabPBR 1.3 standard is supported. Latest versions include 3.1 and 4.0.
As with Kappa, For 3.x go to Lighting/Lights and set Blocklight Multi to around 0.3. Set Lighting/Texture Emission to on as well.
You can enable Directional Lightmaps and Lighting Smoothing to your own preference.
In Terrain/Reflections enable Resourcepack Reflections, Terrain/Parallax Occlusion Mapping enable Parallax Occlusion Mapping and raise Samples a bit.
For 4.x and VX, go to Lighting/Colors and set Blocklight Strength/Illum to 0.3. Also, Lighting/Indirect Light and set Emission Mode to 1 (or Hardcoded + LabPBR)
In Terrain/Reflections enable Resourcepack Reflections, Terrain/Parallax Occlusion Mapping enable POM (or Parallax Occlusion Mapping) and raise Samples a bit. -
Vanilla Plus
This shader has been supporting LabPBR since version 2.1. Version 2.3 at least recommended. -
Continuum 2.0.2 and below
use the OldPBR pack and configure the shader to use old PBR
(or use the converter to convert the pack to old Continuum format and set that parameter in the shader options, but it’s not guaranteed). Also, use the glass fix add-on. -
Continuum 2.0.3 and later 2.0 versions
use the LabPBR default pack and put the glass fix add-on on top of everything else. Configure the shader to use LabPBR (it’s LabPBR 1.3 compliant) -
Continuum 2.1
use the LabPBR default pack. -
Continuum RT
use the LabPBR default pack as well. -
Chronos
use the LabPBR default pack for later versions. -
SEUS Renewed 1.0.x, E2
use the OldPBR pack - SEUS PTGI (most versions ?)
You should use OldPBR and in surface options you should set specular tex smoothness in r channel, specular tex metalness in g channel.
If you use GeForceLegend's patch for SEUS PTGI HRR 2.1, this adds emissive support. In that case you’ll need to set emissive in b channel (blue). -
Raspberry
You can either use :
– the OldPBR pack and in shader config/tweaks/textures set Resource Pack Emissive Map to on and LabPBR 1.3 support (or emissives) to off. This is the preferred method for public 4 version and earlier.
– the LabPBR pack, in shader config/tweaks/textures set Resource Pack Emissive Map to on and LabPBR 1.3 support (or emissives) to on. This method requires the Raspberry experimental version from may 8th, 2020 or later. It could work with public 4 but with a very small loss in normal accuracy.
TL; DR I recommend using OldPBR and setting the LabPBR 1.3 support to OFF in the parameters. -
Molly (older versions)
use OldPBR with this shader. -
MollyVX (latest versions since rewrite)
Use OldPBR too. LabPBR is partly supported but you'd lose ambient occlusion, so I don't recommend it.
As for the option in Resource Pack... called Emissive Textures, you can either use off which will only use hardcoded emissives, bloom that will only emit light on texture-set emissives in screenspace, and pathtracing that's the real deal.
I think later versions of Molly have had issues with anything other than off though. (Earlier versions had texture only and such values but those were a bit more confusing) -
Chocapic
Most versions should use OldPBR, except Chocapic v9.1 Extreme PBR test 2 which supports LabPBR. It doesn't support texture-based ambient occlusion though.
You can also use OldPBR to have baked-in ambient occlusion in the albedo map if you find the results with LabPBR to lack "contrast". -
Loop
you can use LabPBR with this Chocapic edit that features reflections and speculars. -
Sildur’s v1.2x
Use OldPBR here. -
Ymir
Use the LabPBR default package. -
Robobo1221’s shader
Use OldPBR, in the shader parameters select surface/lighting/specular options and set format to old. -
Spectrum Shader
Use LabPBR and make sure to select materials/resource format LAB in the shader options. It should be LabPBR 1.3 compliant as of May 2020. -
Fraction Shader
Use LabPBR like for Spectrum (shader can be found on the Discord you'll find a link to in the GitHub main page. Look for the #fraction-updates channel) -
ProjectLUMA
use OldPBR with this pack and set surface PBR format to default in the options. -
Complementary versions 3.0 and later
use the default LabPBR pack. -
AstraLex (formerly BSLex)
use LabPBR. Earlier BSLex versions might not support LabPBR but later versions and AstraLex have been for a while. -
ApolloRT
use the OldPBR packs.
I haven’t tested all shaders but feel free to test any other shader with different combinations and leave me a message so I can update the list !
How-to: adjust parameters for memory and performance
For more details you can check this guide I posted on the Vanillaccurate blog. It is a bit outdated but it might help you configure your system to ensure you can run the highest resolutions your system can support
First and foremost, here are the recommended system specs:
Pack and resolution | System RAM | Video RAM |
|---|---|---|
256x | 12-16GB | 2-4GB |
512x | 32GB | 4-8GB |
512x LITE | 16-24GB | 4GB |
256x | 12GB | 2GB |
512x | 16-32GB | 2GB |
1024x | 32GB-64GB | 4GB |
2K | 64GB | 4-8GB |
Since Minecraft 1.15 the memory constraints have been much higher than 1.14 and before. It's therefore recommended to adjust some parameters to get the best playing experience possible.
PLEASE be aware that you might not be able to load all the packs you want at the same time. The tentative recommended specs are for base packs only without add-ons.
For instance, if you want to use Realaccurate 2K you might not be able to load the base pack, TWC pack, Util pack, and EndNether pack at the same time.
Same goes for Vanillaccurate, you might not have luck loading Vanillaccurate 512x with CTM add-on and items-mobs add-on loaded together.
As a rule of thumb, if your game crashes when loading one or several packs at one point try unloading some add-ons or using lower resolution.
There are several steps to optimize your system for Minecraft.
There are some system parameters you can adjust, Java versions to install, Minecraft configuration switches to set, in-game parameters to tweak...
Java runtime environment/JVM and switches:
There are three main options you might want to choose from: internal, OpenJDK with HotSpot, OpenJDK with openj9.
Internal runtime (older Oracle Java8 runtime with HotSpot JVM)
with HotSpot JVM
with openj9 JVM
To install OpenJDK, check out the website:
Next you need to configure your Minecraft installations (the ones with Optifine installed).
In-game settings to change:
- 1- Quality Settings
- 2- Detail Settings
- 3- Performance Settings
- 4- Animation Settings
I suggest downloading a portable pack and unpacking it in a folder dedicated to Minecraft so not to mess up your current Java installation. Minecraft only requires the executable.
There are other alternatives of course, but those should cover most needs.
This one works well enough with smaller resourcepacks and fewer constraints. It's an old Java version which usually has good compatibility. I don't recommend it for large resourcepacks and/or heavy mods.
The OpenJDK runtimes can be found in various flavors: Java8/11/16 (as of 2021-08) and either HotSpot or openj9 JVM.
Java8 and Java11 are LTS and should get support for some more years. Java8 is the trustworthy old version while Java11 is a bit more recent with some improvement/fixes and an experimental new garbage collector called ZGC.
Java15/16 are the most recent version with latest changes and refinements, but may still conflict with some mods.
Overall I'd recommend Java11 or Java16 (especially with latest 1.17 versions), but feel free to try others by yourself!
The HotSpot JVM is usually a bit faster (more FPS) than openj9 but has a larger memory footprint overall. If you have spare RAM when you've loaded all the desired packs, then you could give this one a go.
This JVM is a little bit slower than HotSpot overall, but seems to manage memory better. If your computer is within specs and still can't load your packs, try switching to this JVM, it could help a bit. Don't expect dramatic improvements though.
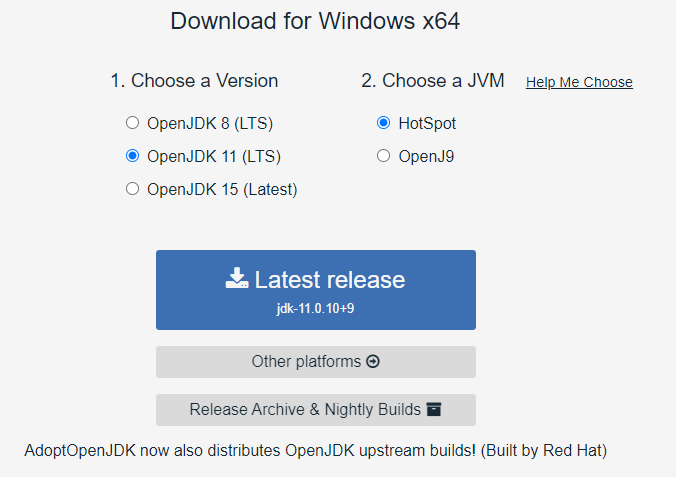
Click other platforms directly, you'll choose a portable pack in the next screen:
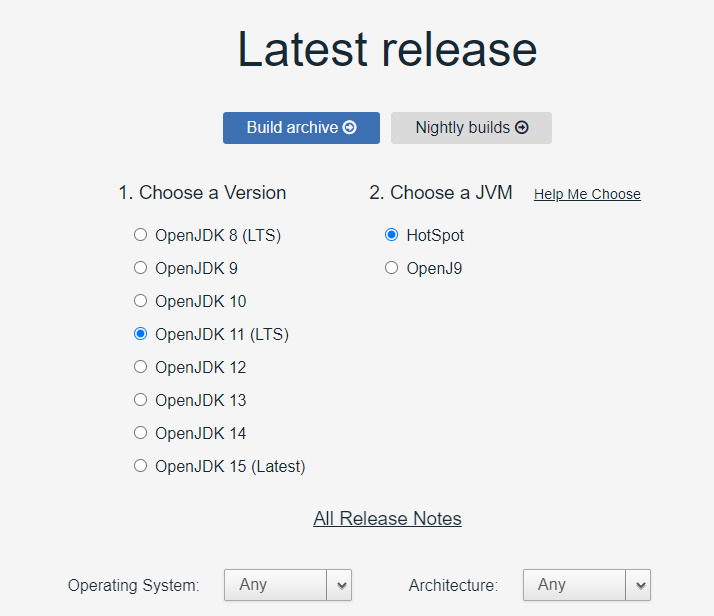
Pick the Java version you'd like (8, 11, 16), as of 2021-08 the latest version is 16) and the JVM you need (as stated above).
Scroll down and look for the Windows packs for x64 platforms, and get the JRE (you don't need the full SDK) as .ZIP archive:
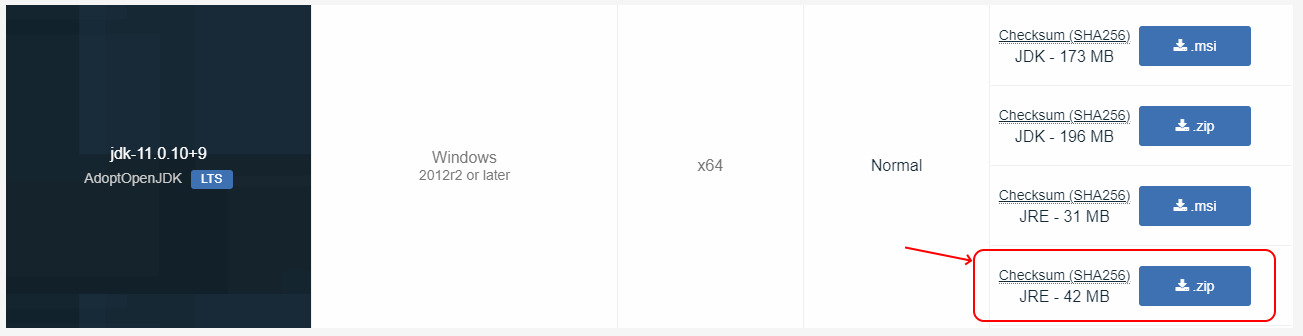
Now unpack this .ZIP in a new folder dedicated to Minecraft.
Under contstruction
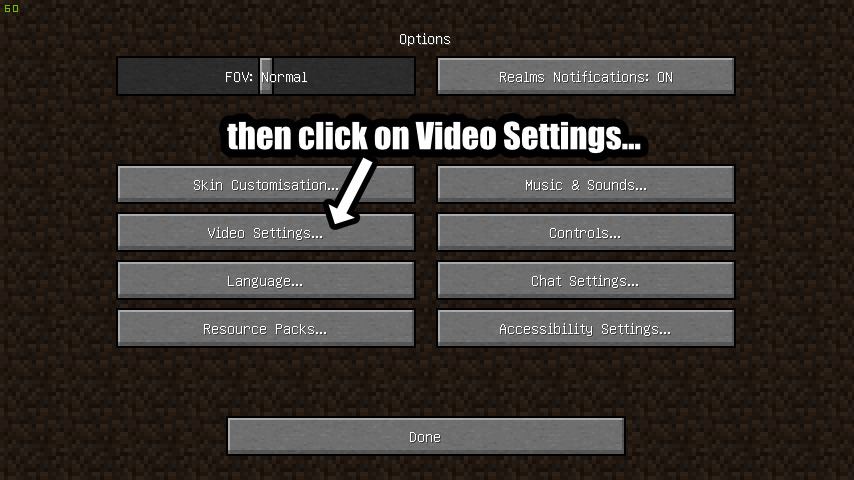
First, open the Options... menu:

Then Video Settings...:
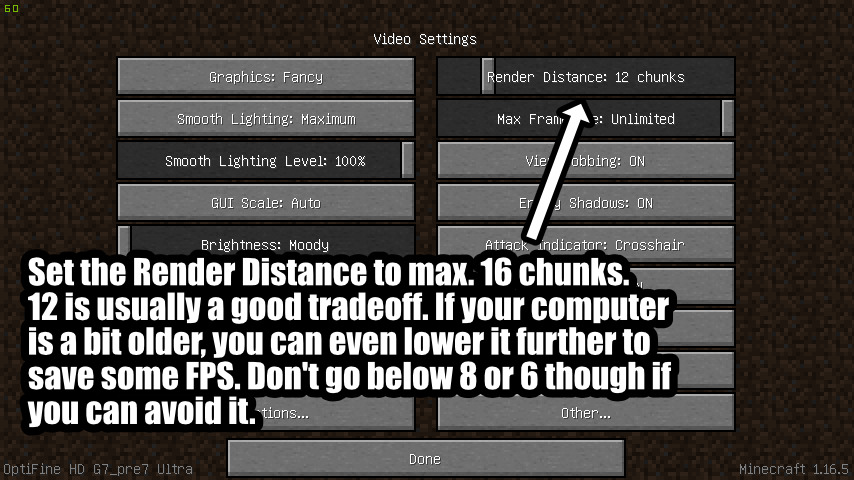
First, set the Rendering Distance to a value no higher than 16 chunks.
A value of 12 chunks is good enough for most mid-end computers. You can go lower if your computer is older or less powerful.
Avoid going too low as much as possible. Below 6 chunks it might look pretty cramped.
Next, check the following screens:
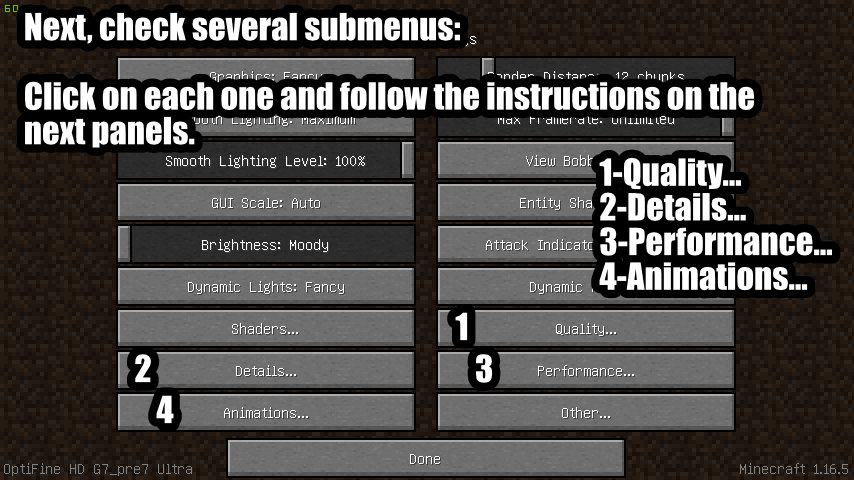
and read the following instructions:
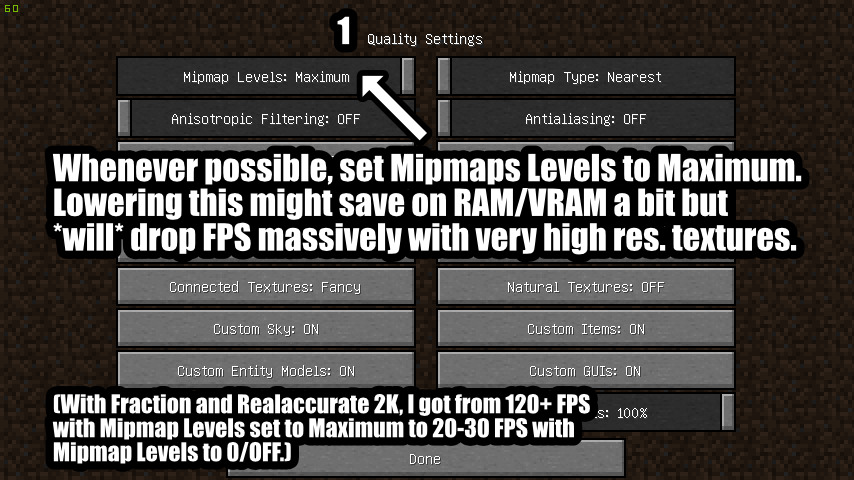
Adjust the value of Mipmap Levels. Using Maximum will ensure best performance but will cost more VRAM.
Using lower values (or none at all, i.e. OFF) should be used as last resort for very high resolution packs (like 2K) when memory is full.
Lowering Mipmap Levels will result in slightly better RAM/VRAM usage but significantly lower FPS.
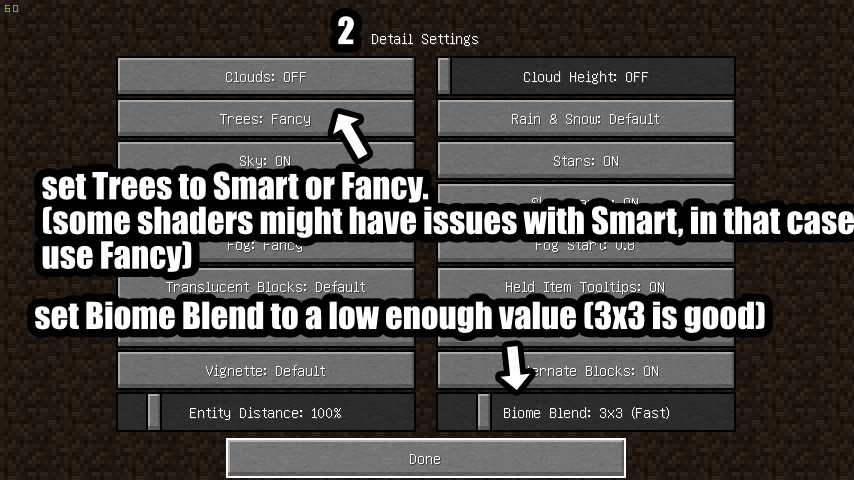
Here, set Trees to Fancy or Smart. Smart is faster but can cause issues with some shaders.
If you notice issues with tree leaves and your selected shader, switch to Fancy instead.
Also set Biome Blend to 3x3 which is good enough. High Biome Blend can have a significant impact on FPS.
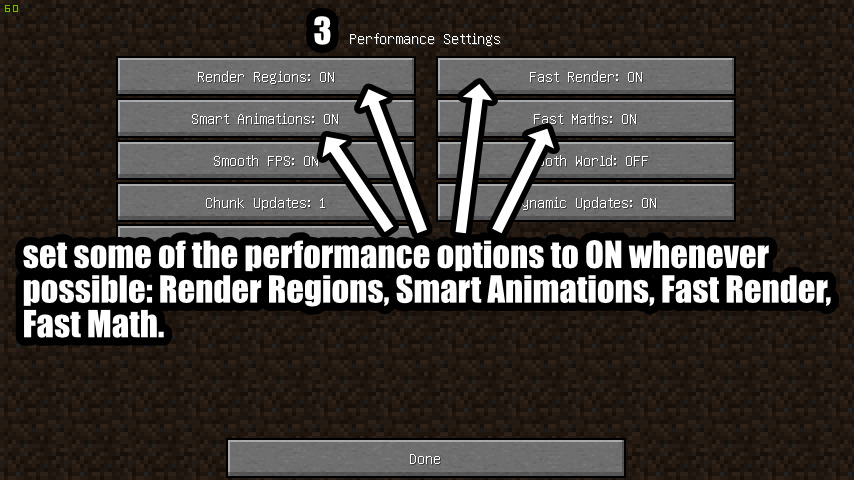
You can enable some of the performance settings here. Some might improve FPS and stability a bit, but your mileage may vary.
No harm in enabling them though, so go ahead.
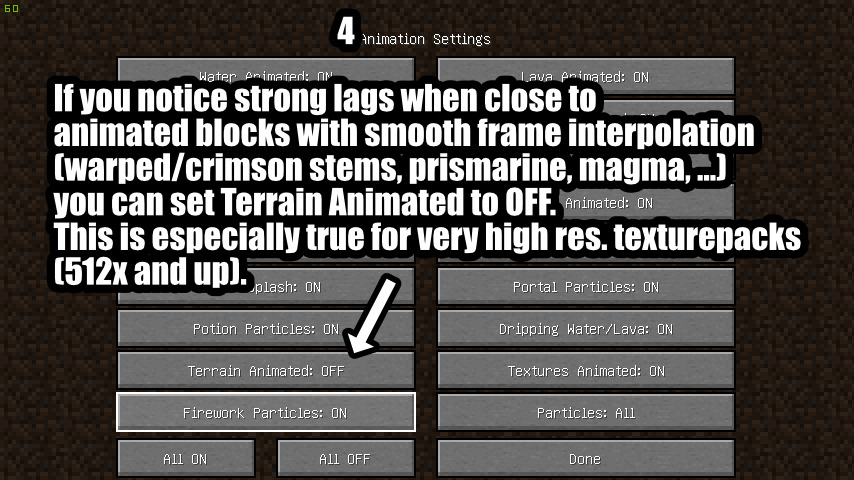
Set Render Regions, Smart Animations, Fast Render, and Fast Math to ON.
Smart Animations could improve performance when animations are enabled, but it still might not be enough with very high resolution packs that feature smooth-interpolated animations (see next #).
If you're using high res textures (512x and up) then smooth-interpolated animations might cause a massive drop in FPS.
Smart Animations in the previous screen can help but for very high resolution packs it's not sufficient as when those animations are on-screen they'll still cause your FPS to drop significantly.
In that case, you might disable terrain animations altogether, setting Terrain Animated to OFF.